So one day I was at the bookstore checking out the car magazines for some stuff about MX-5, when I came across an article about a guy in Britain that modified his Miata. I started reading and found out about the Mega Squirt PNP and I was fascinated. This was exactly what I was looking for. This little unit replaces the original ECU, has timing maps, Volumetric Efficiency (VE) maps, Air/Fuel Ratio (AFR) Maps, Nitrous enrichment, cold temperature enrichment, auto-tuning and much much much more. I'll try to cover as much as I can here, from the beginner stuff to advanced. I'll also try to have some videos.
Installation: (Here I will follow closely the instruction from the box)
Tools:
Timing light is a must!
All the other tools you already have if you work on a car or else you are a crazy to even attempt a job like this.
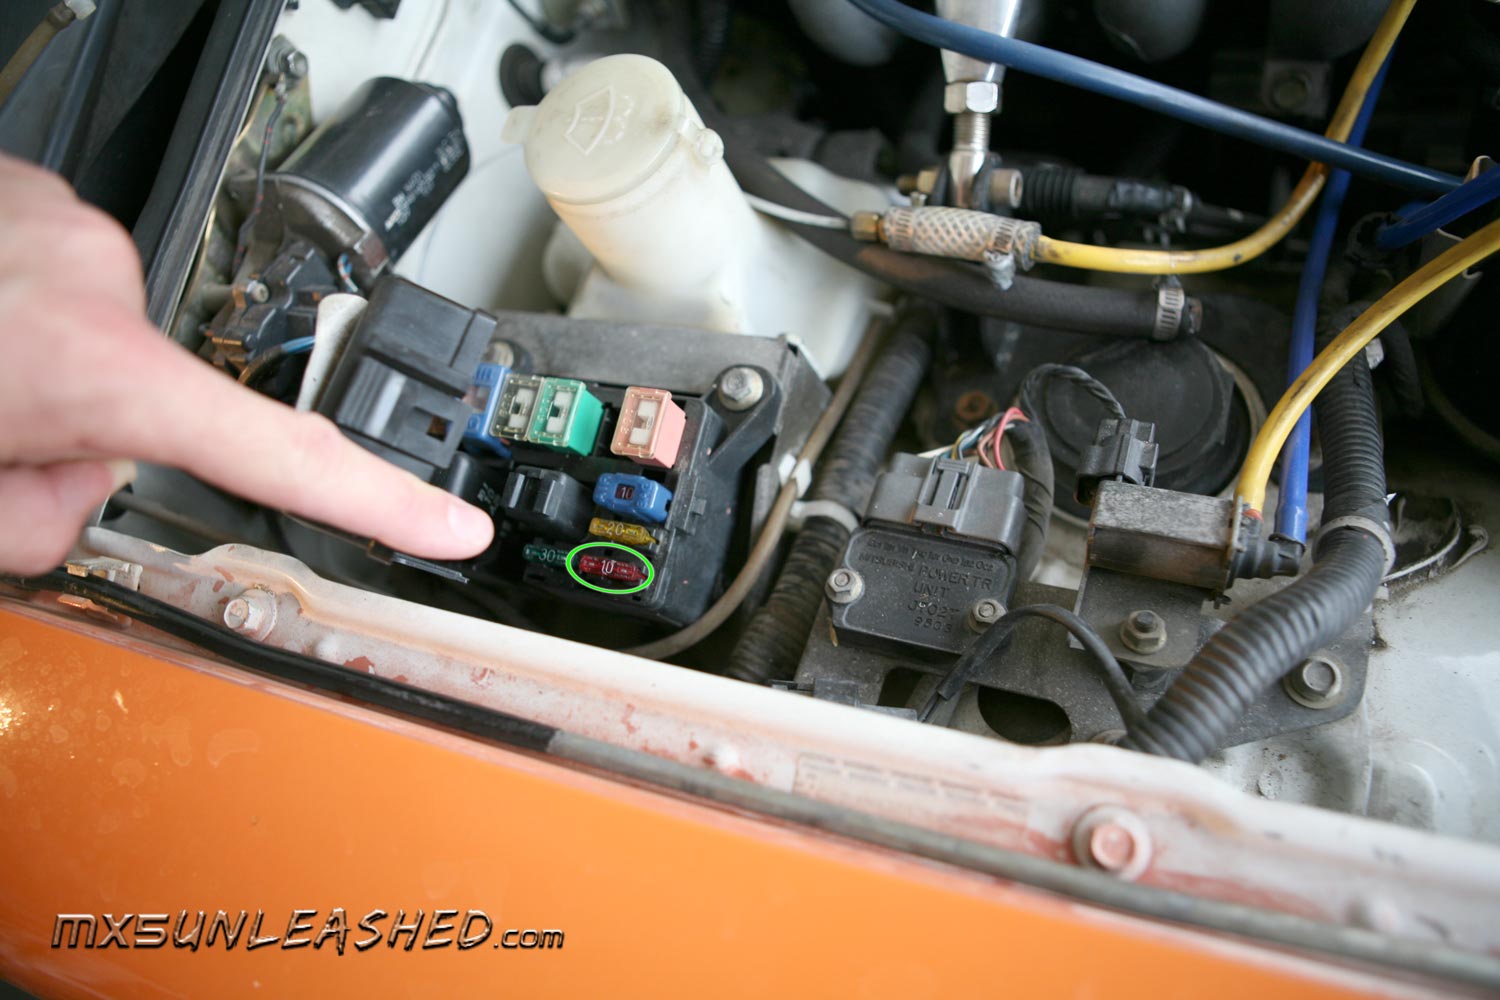
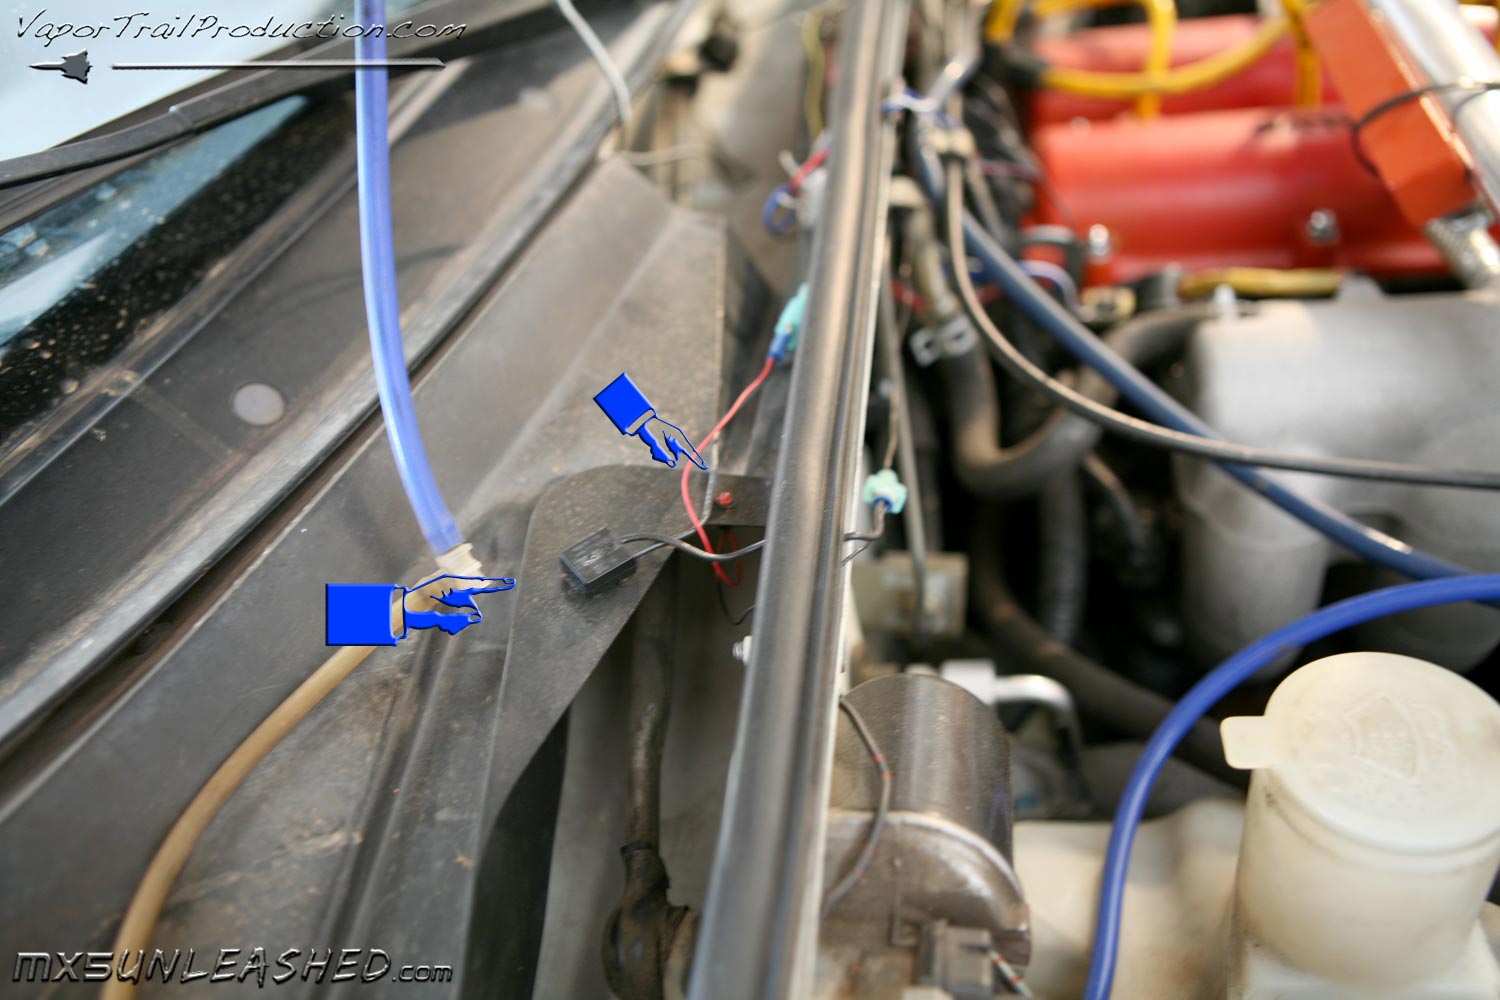
YOU MUST TAKE OUT THIS FUSE - it's a 10 amp one
DON'T EVER PUT IT BACK AS LONG AS YOU ARE RUNNING THIS SWEET MEGA SQURIT PNP.
I hope I'm crystal clear on that.
Click on the images to enlarge them
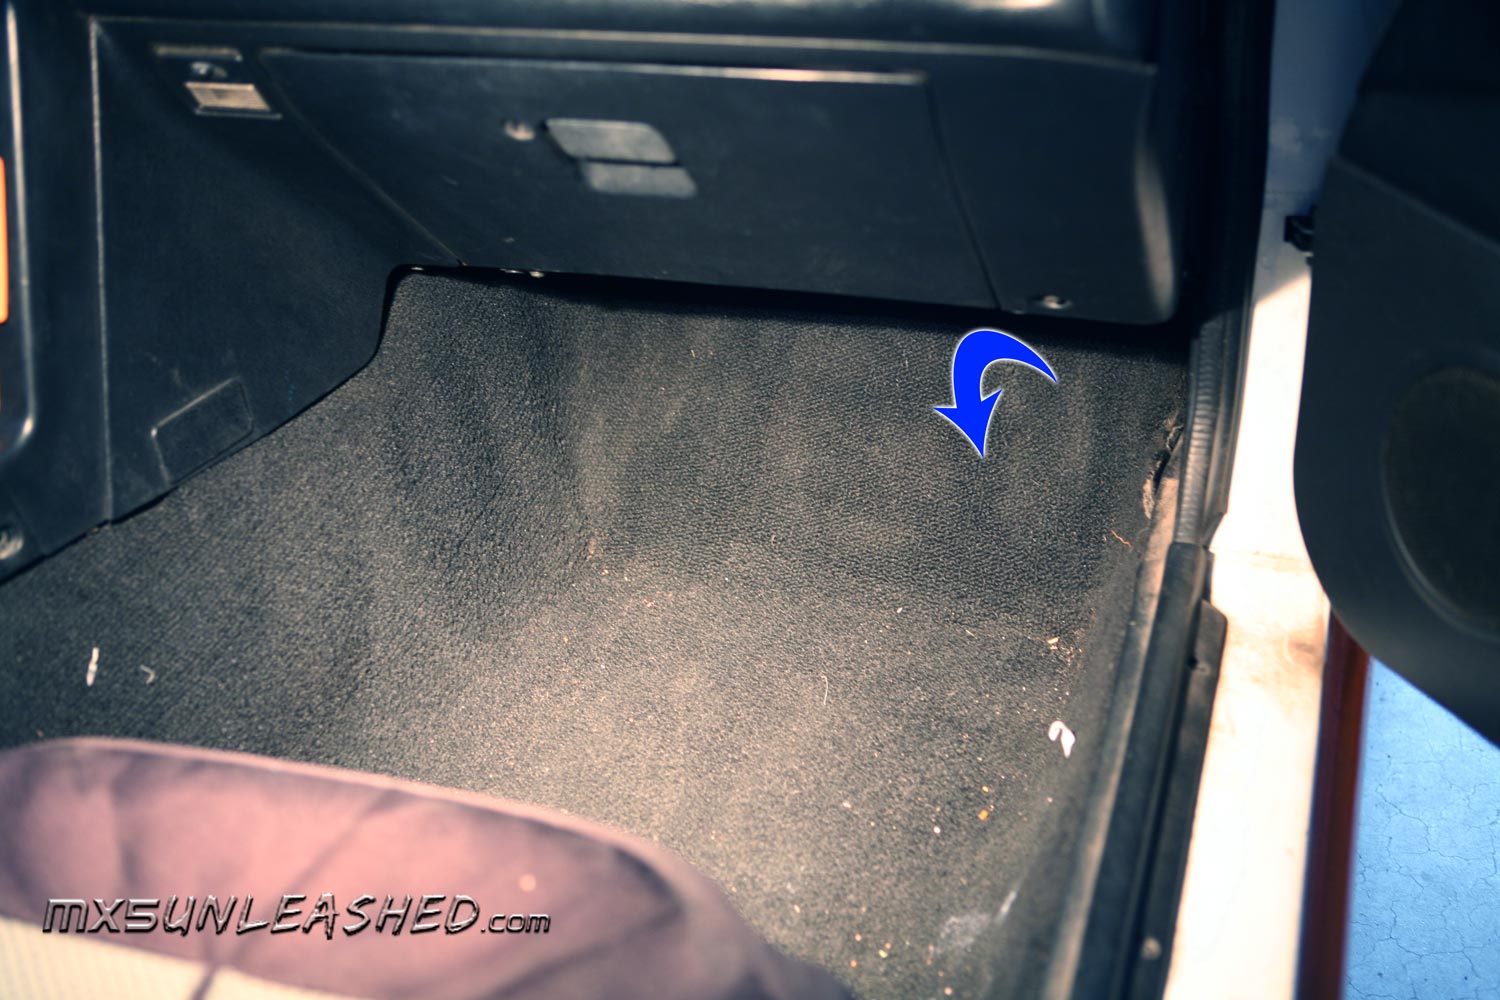
Getting to the ECU
First the carpet : On my car it must have been an old carpet because I just pulled it back, but you may need to remove the passenger door trim panel and the kick panel.
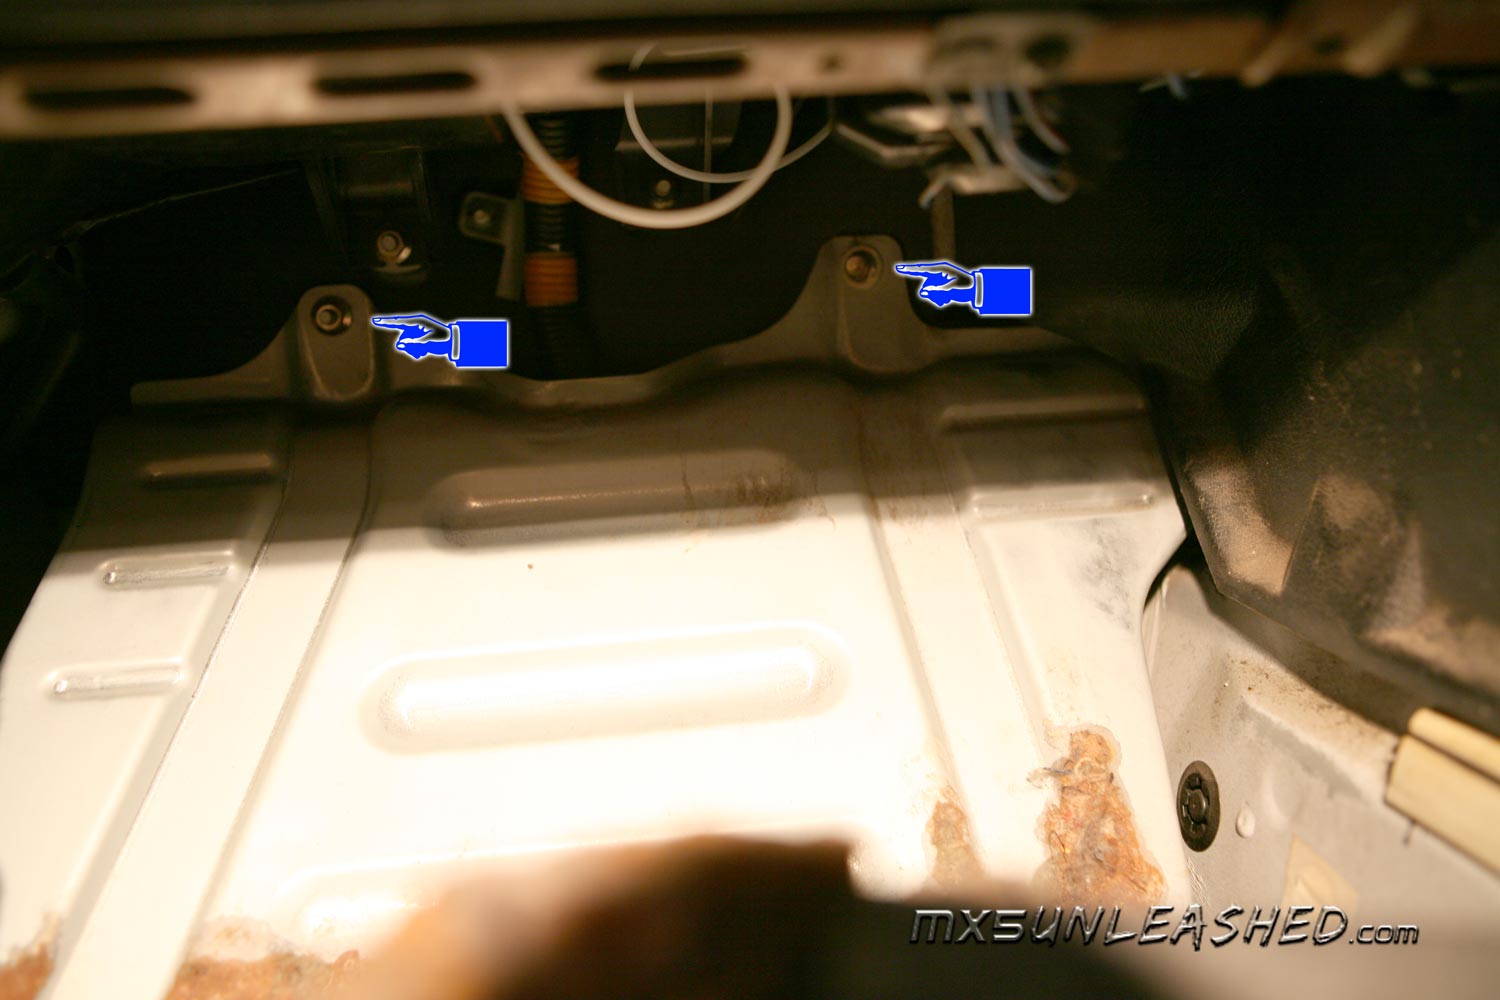
Protective Panel next: 5 bolts are holding it, 3 on the bottom and 2 up top.
Click the images to enlarge
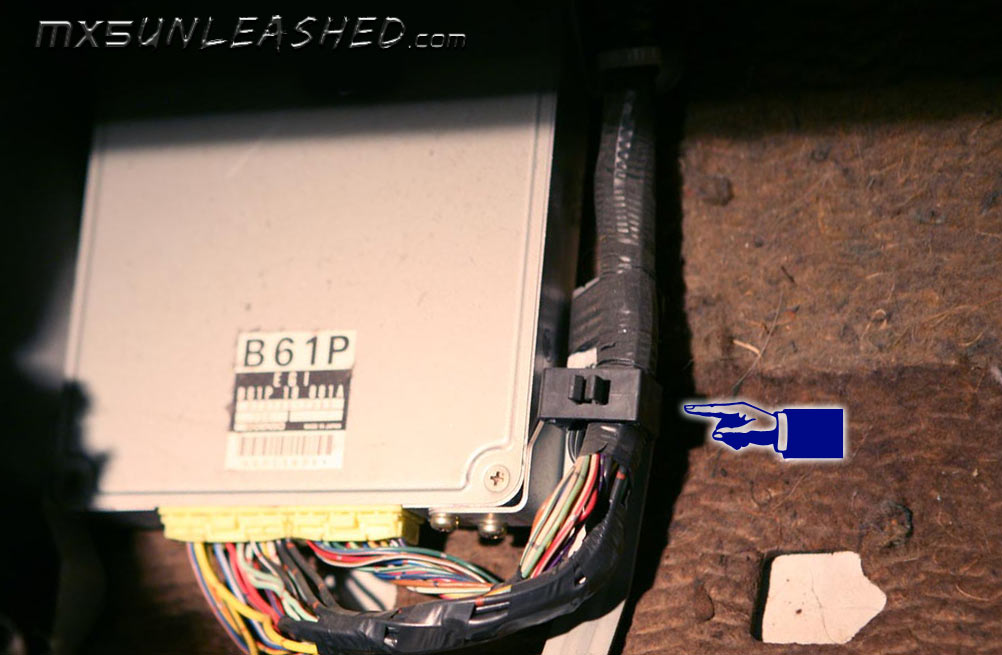
ECU
First, pop the strap that holds the harness to the car, then you can pull the ECU out of its cradle. Next unplug the 2 plugs, a little flathead screwdriver will help. Then put the old ECU in a safe place, just in case.
Click the images to enlarge
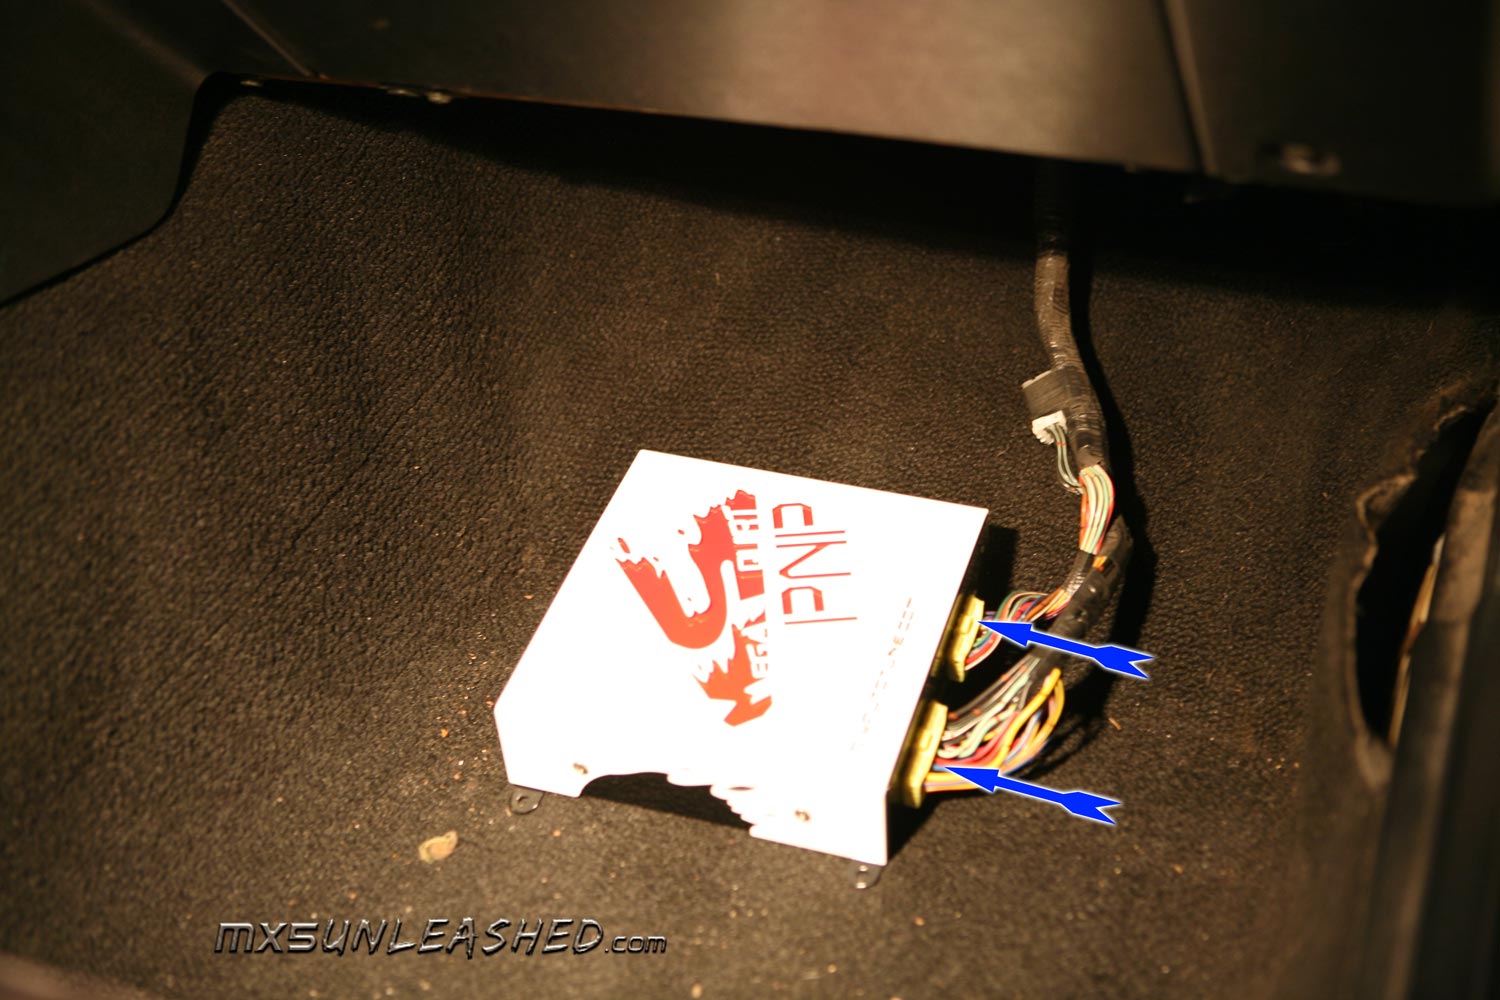
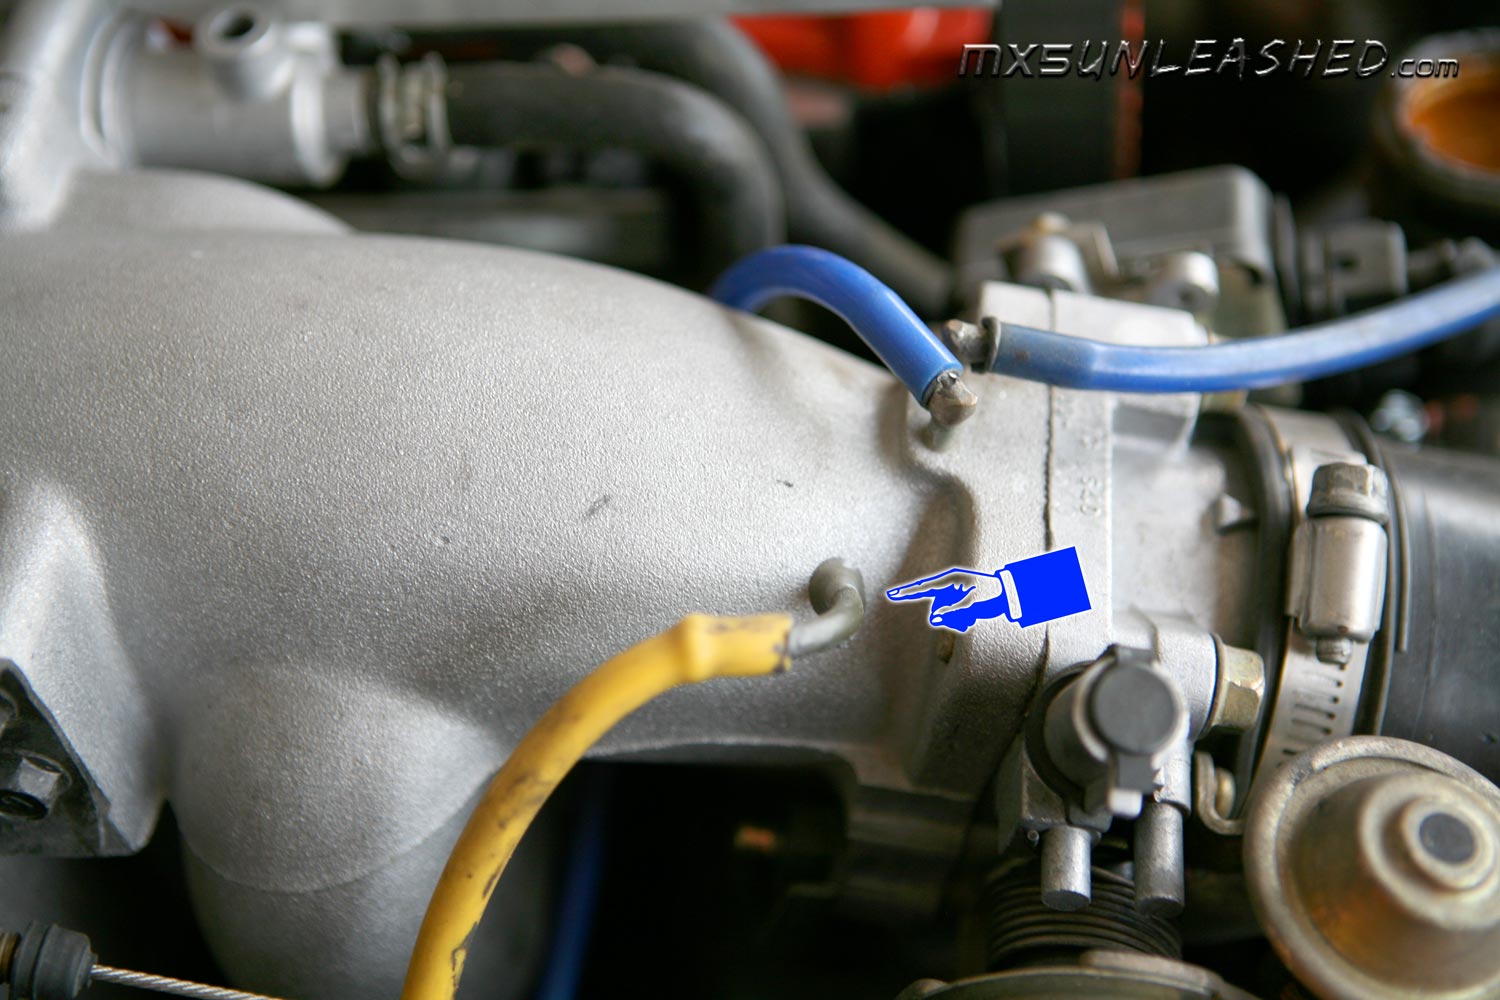
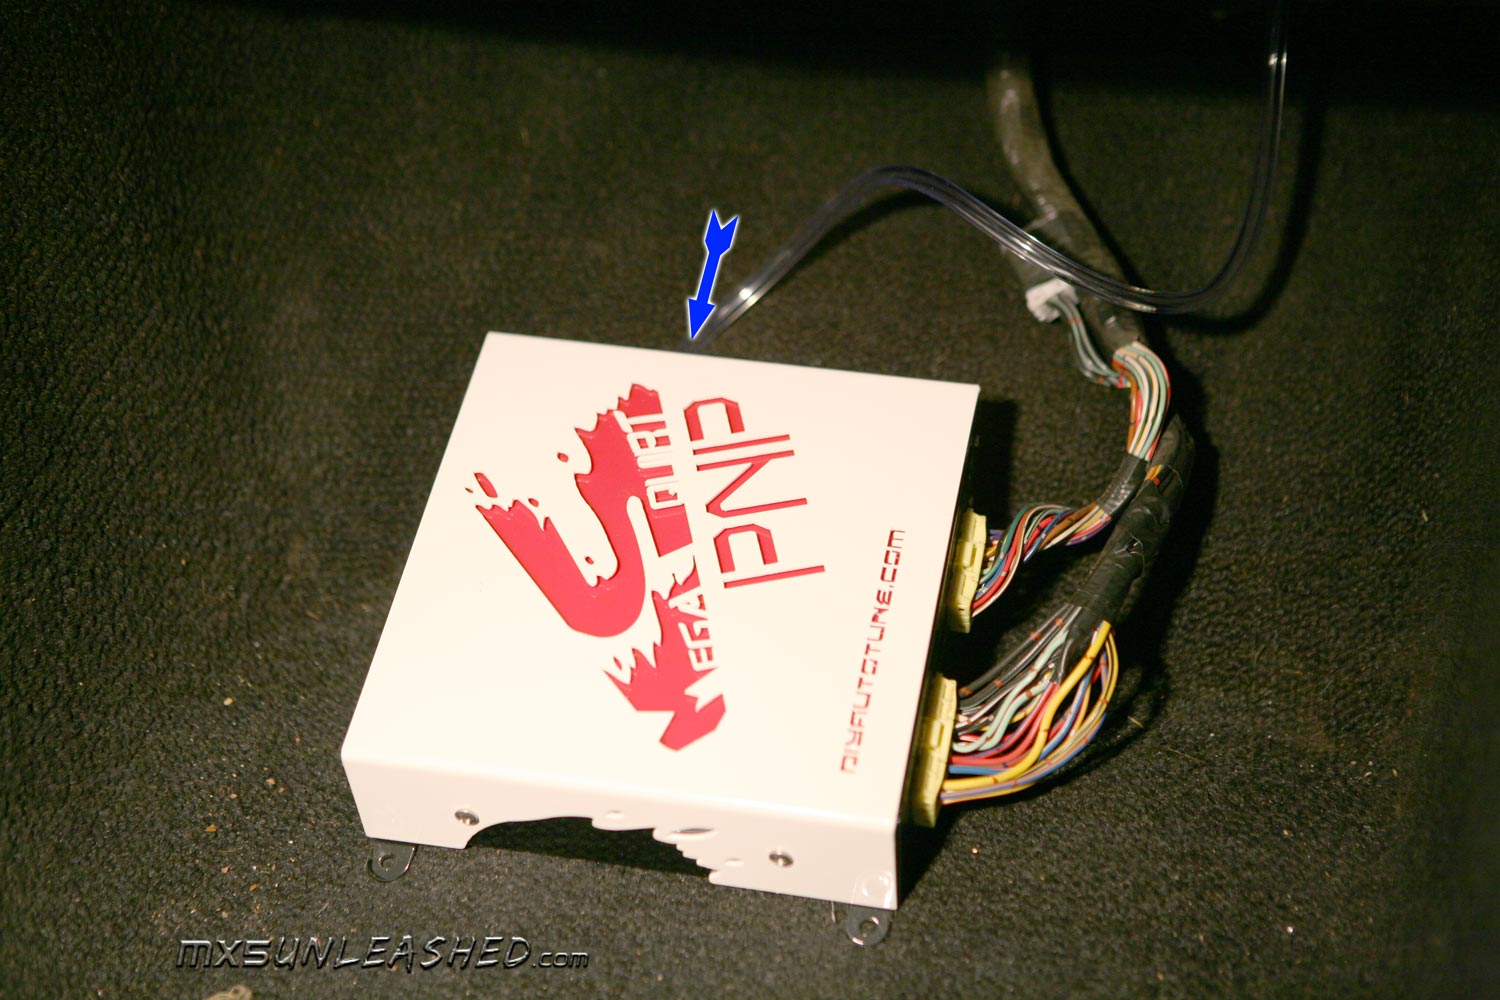
Next, plug in the new ECU Mega Squirt PNP. You can't mess up the plugs, they only plug in to correct plugs. After that the vacuum line, I have another pipe added to the intake plenum but you can put a "T" on the vacuum line going to the cruise control, the other one goes to the carbon canister and there is a switch that switches on and off which would produce pulses in your signal. Next run it through the fire wall right below wiper motor and then hook it up to the ECU.
Click the images to enlarge
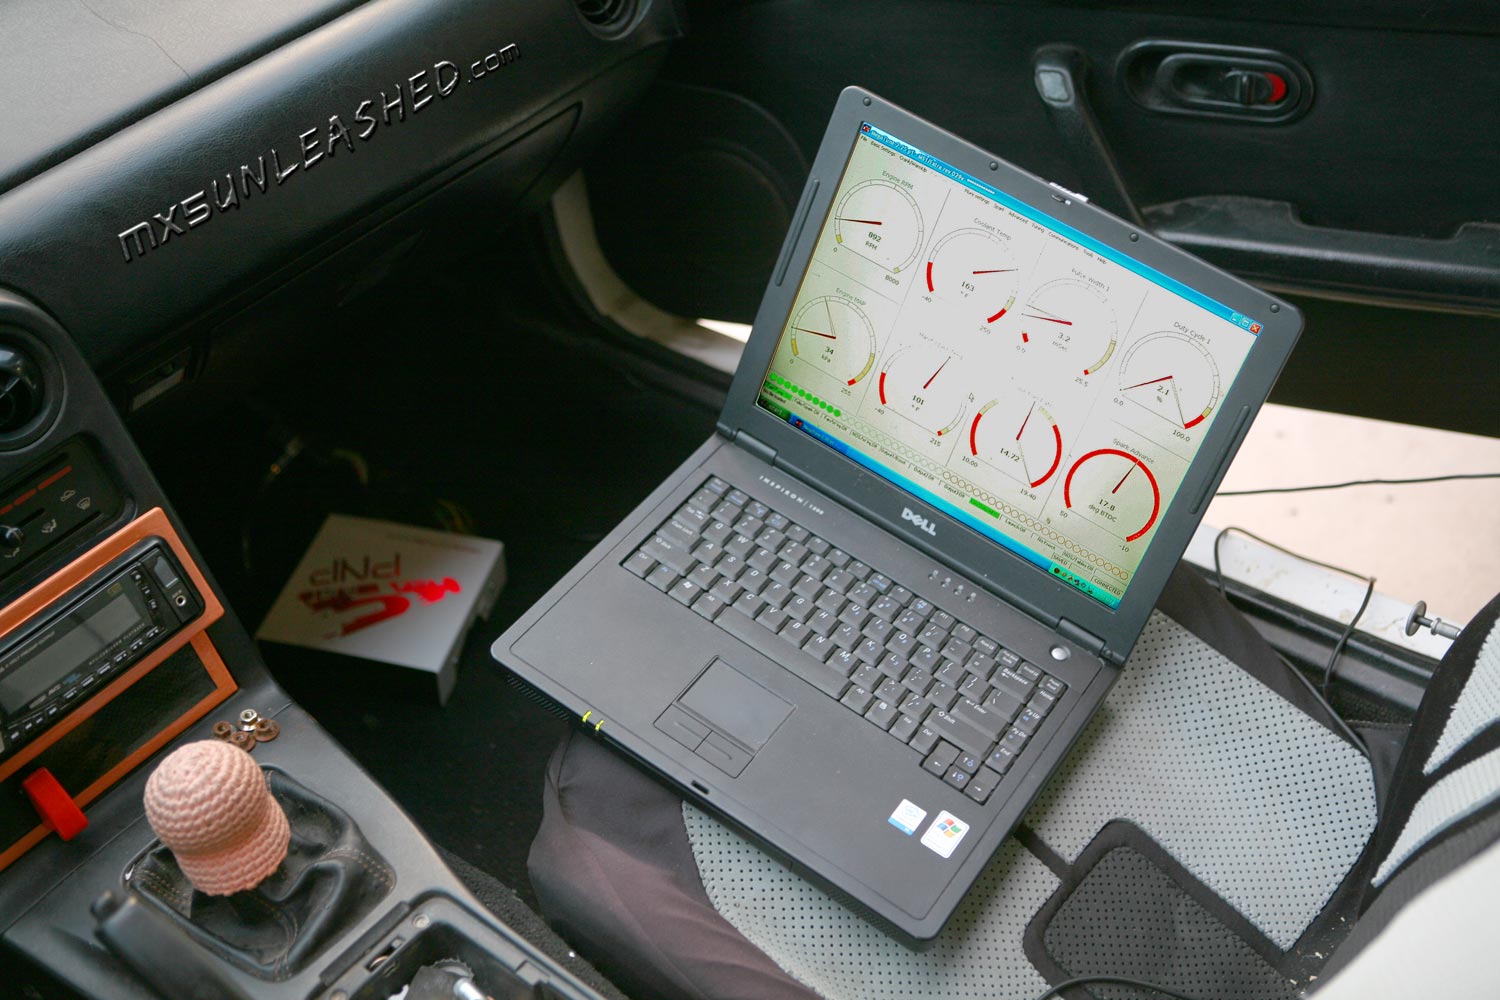
I left my ECU outside, just in case, until everything is working fine. Next my laptop has only USB and the MS PNP has a serial port. So if you have a similar issue you can get an adapter from most electronic stores, just make sure you get the one with the installation disc. Then you have to match the correct ports. You can check in your windows settings which USB port you are using and match it in the connection setting in the Tuner program. Keep in mind that in some cases you will only be allowed to use the same USB port. So if you plug into a different USB port in the same computer it may not work. Anyway once you are all hooked up turn on the power and then start the program and there you go.
After that follow the video to set your timing.
Next I will show how to hook up Wideband oxygen sensor because tuning a car with narrowband is like trying to drive a car while looking trough a keyhole.
Click the images to enlarge
After that follow the video to set your timing (Watch it in HQ)
Watch it in HQ
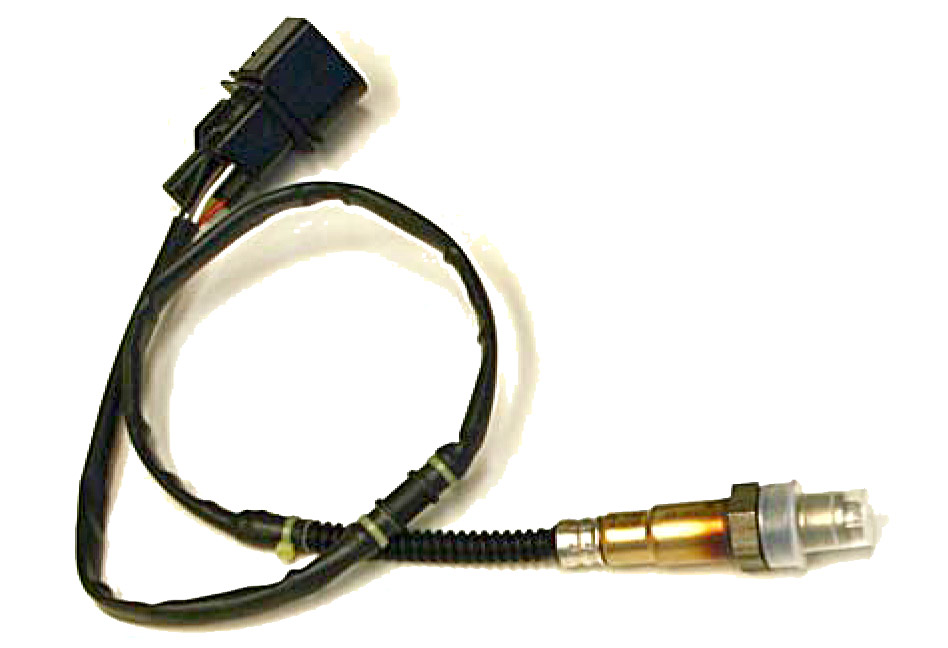
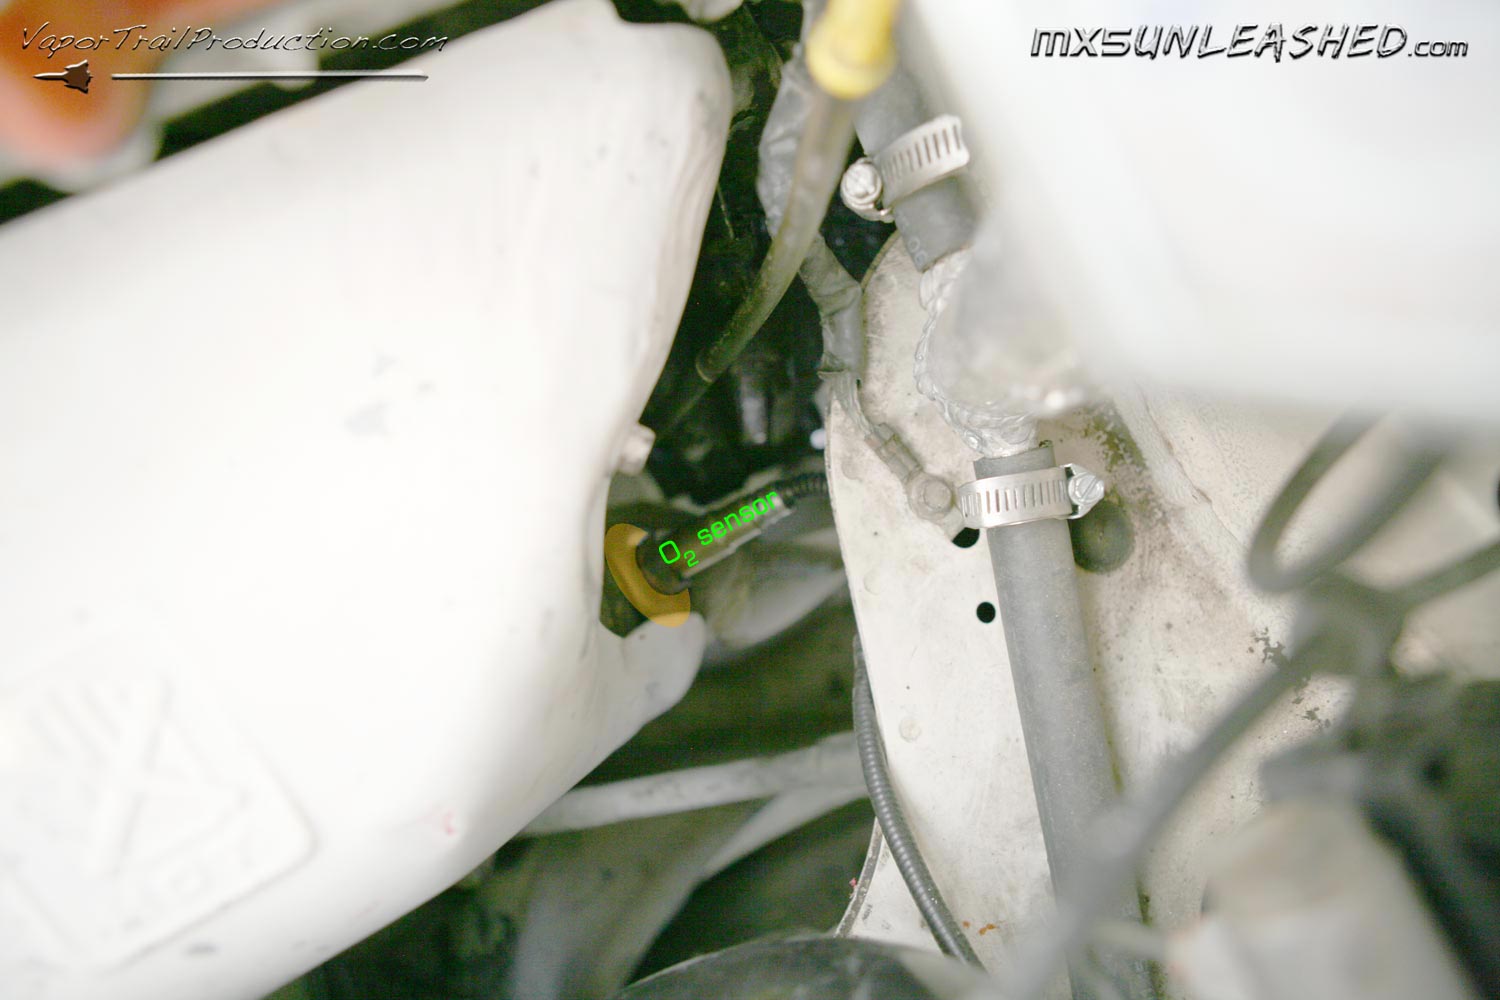
Wideband Oxygen Sensor (O2 Sensor) because tuning a car with narrowband is like trying to drive a car while looking trough a keyhole.
Tools:
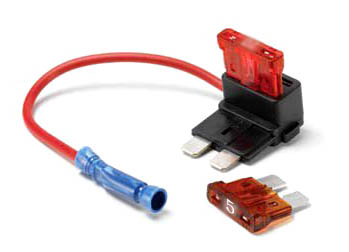
Electrical pliers (one that strips wires and cramps the cramp connectors), fuse splitter, soldering iron, heat shrink.
Few tips on soldering:
Most of the people never wonder how to join two wires together, they either solder them together or cramp them together. Well the problem with just soldering them together is that if the wire vibrates or flexes a lot, with time the copper will break off at the base of the weld. On the other hand cramping the wires give a bit more play to the wires but the problem is that you are cramping it with some other metal and you usually will not put heat shrink over the cramp. So with dissimilar metals and some moisture, you are laying down a welcome mat for corrosion.
Here is the way I found to work best.
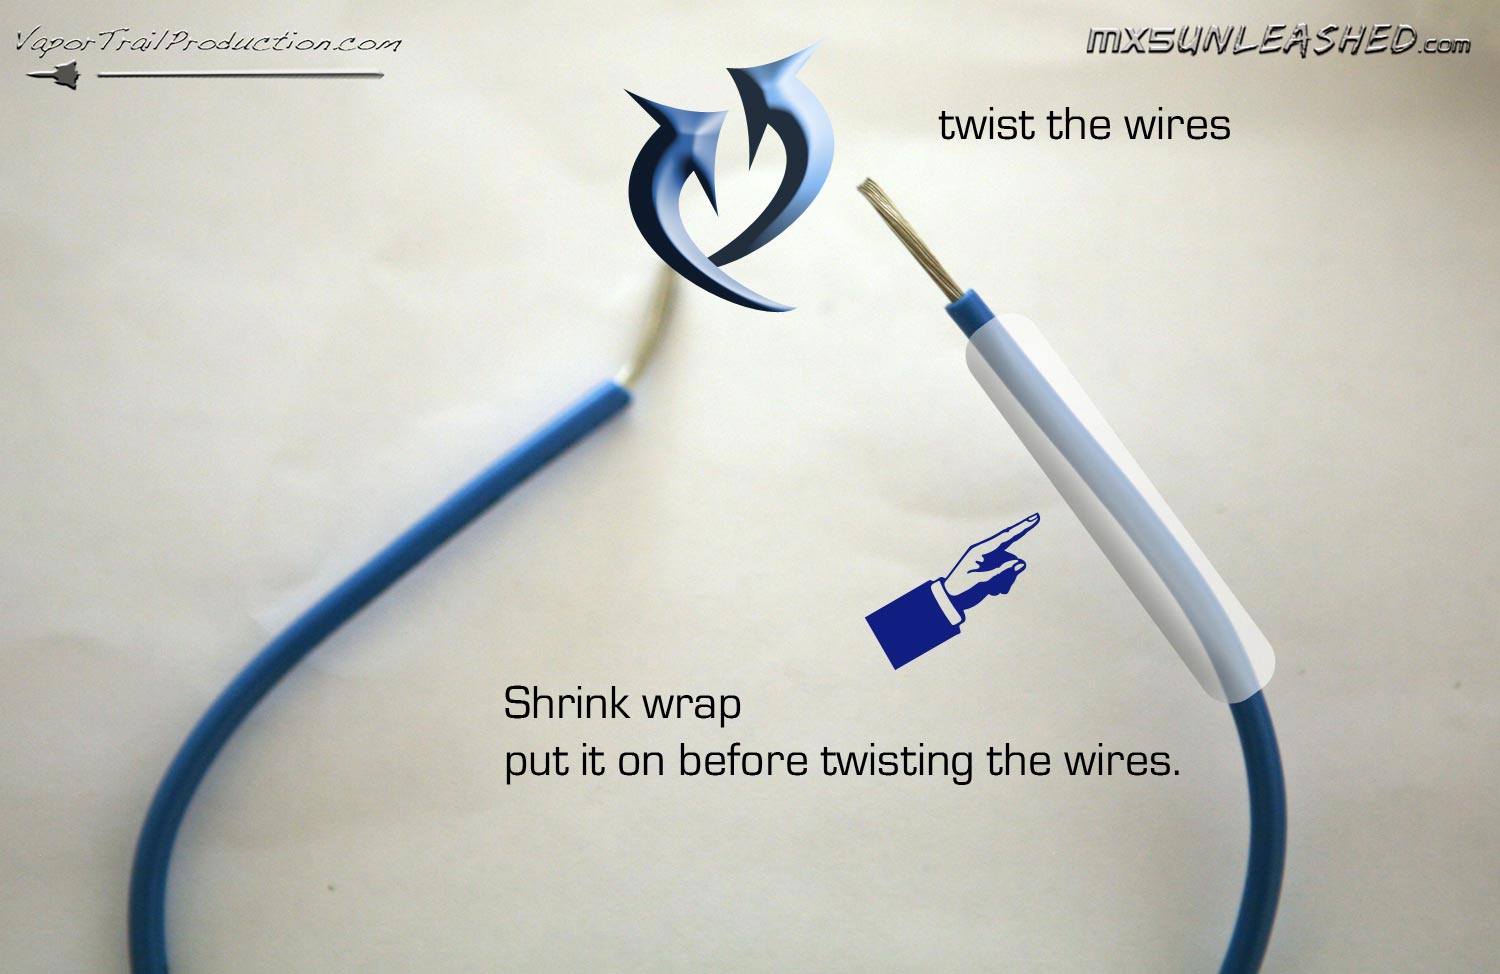
1. Put heat shrink on one of the wires
2.
Twist the wires
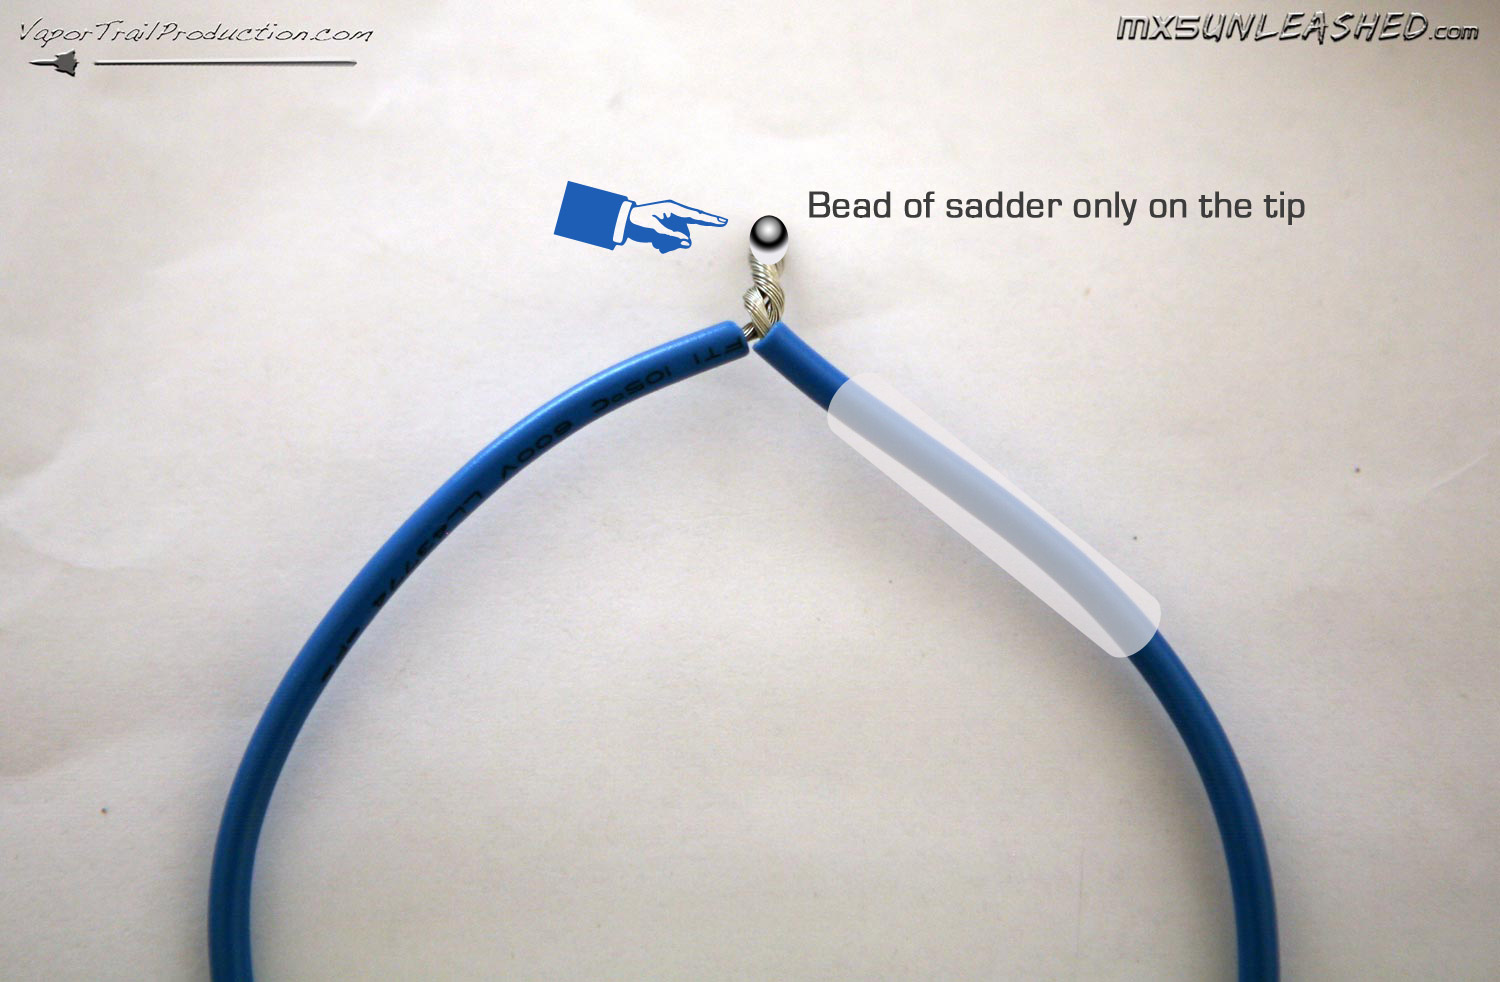
3. Solder only the tips together
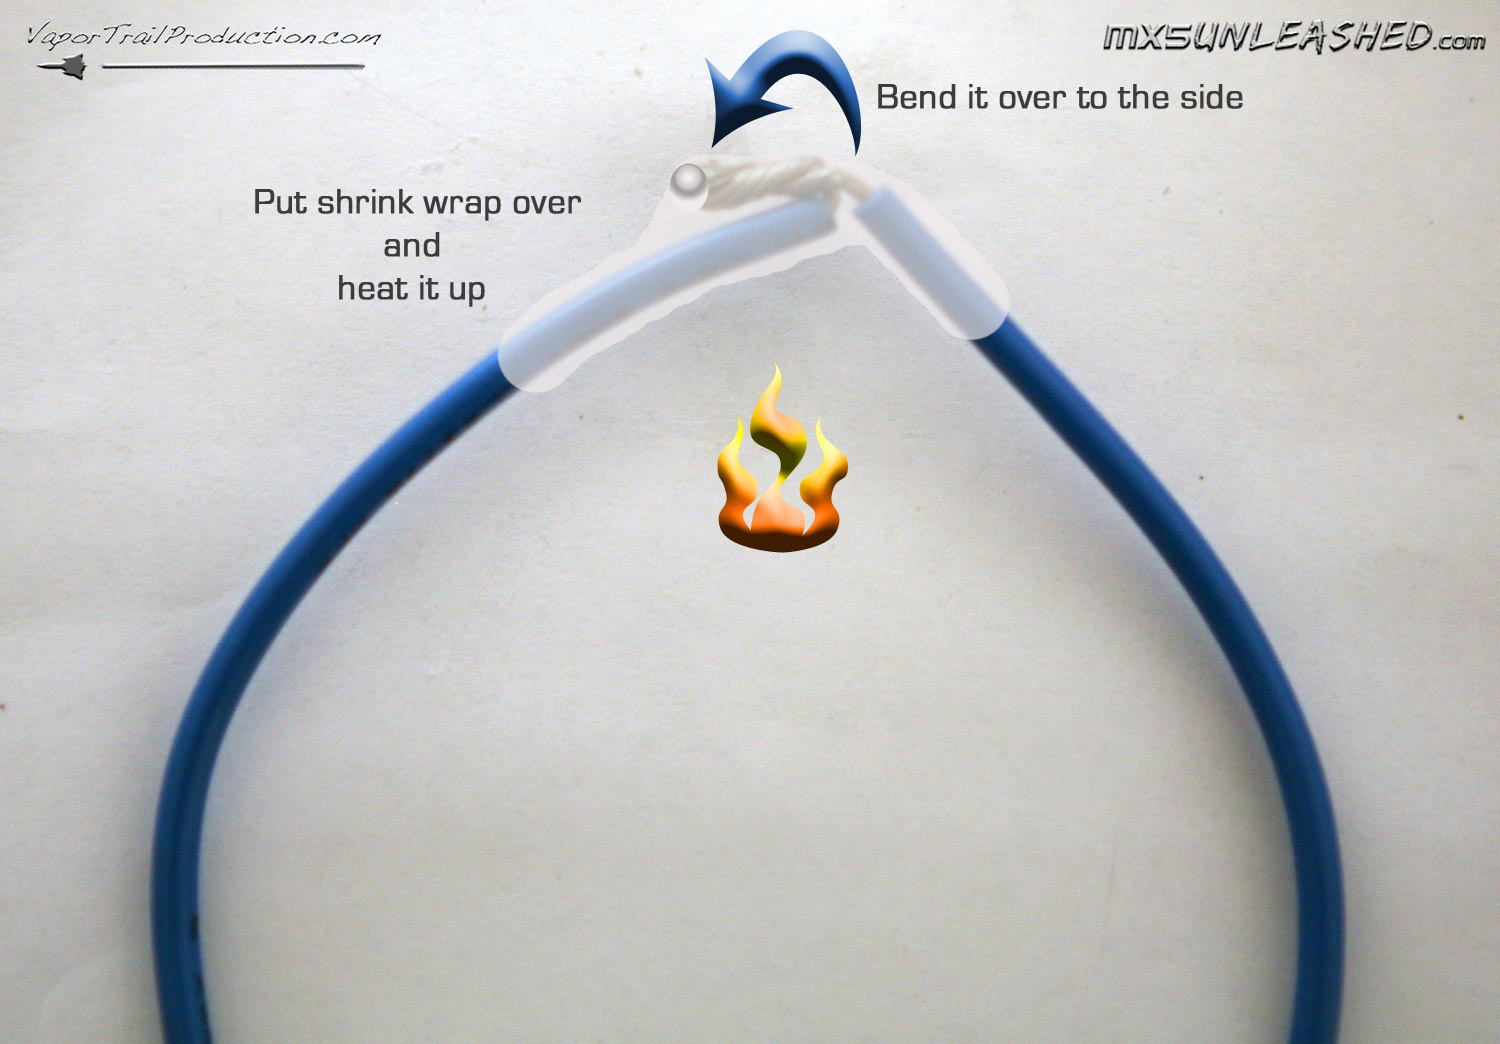
4. Bend over the tips
5. Put heat shrink over and apply heat
First of all, this Oxygen sensor works when it is super HOT so if you turn it on DO NOT touch it and let it cool down afterwards before you do. If you burn yourself or set something on fire it is your fault because you did not listen to the warning! Also do NOT put the sensor into the exhaust pipe until you perform Free Air Calibration.
Click the images to enlarge
Here is the mini computer for the wideband O2 sensor. Also you can see two serial connections IN and OUT, I found that a Sharpies cap work great and I don't have to worry about them getting any moisture. I installed the CPU on the other side of the firewall in the wiper compartment so it stays cool. It is raised so no water gets to it too. But you can find a better place. Remember keep it cool and keep it dry.
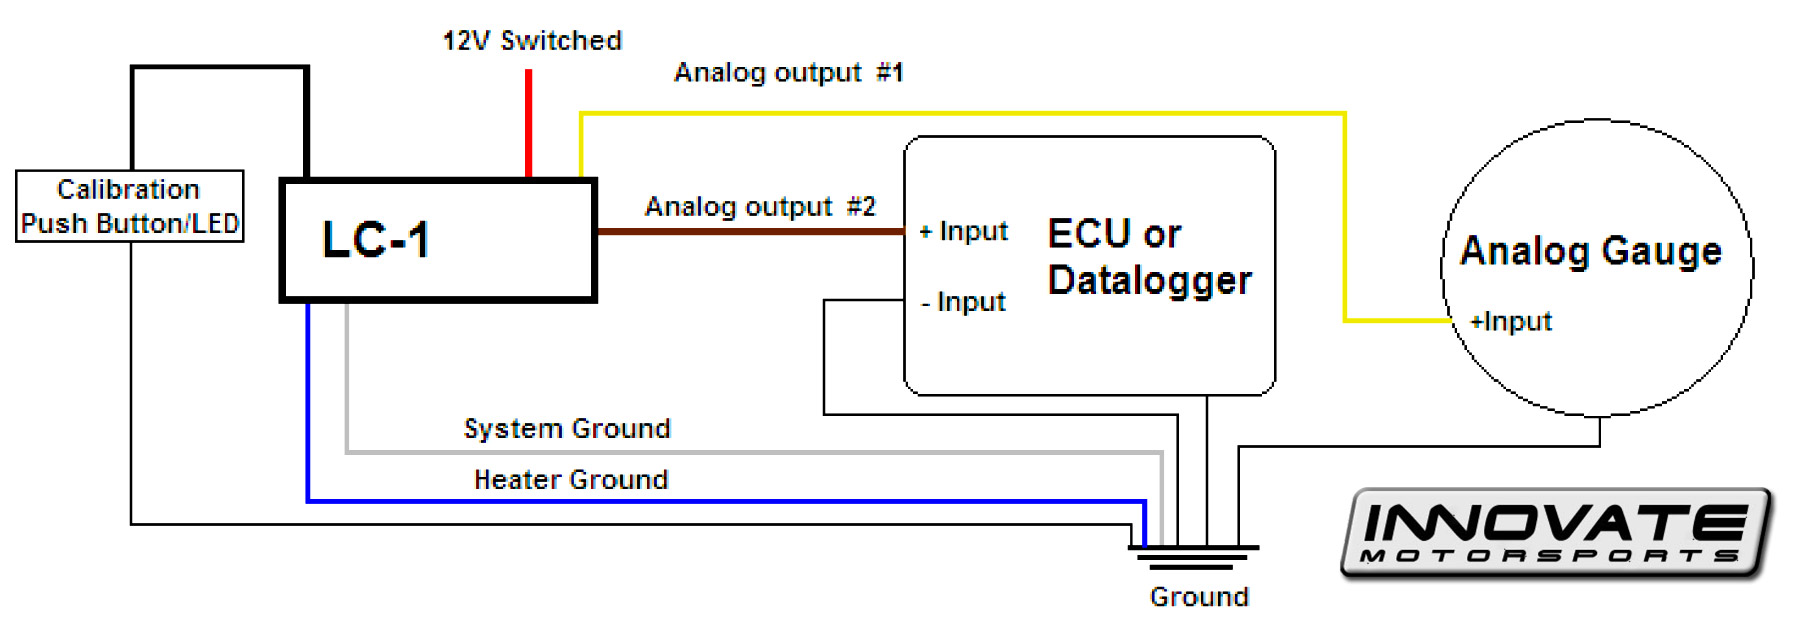
Here is the wiring for the sensor and its CPU.
A. Interface and power cables with 6 stripped ends*:
a. Red 12V supply
b. Blue Heater Ground
c. White System Ground
d. Yellow Analog out 1
e. Brown Analog out 2
f. Black Calibration wire
B. Serial In connection, 2.5mm stereo (female) marked as IN
C. Serial Out connection, 2.5 mm stereo (female) marked as OUT.
Click the images to enlarge
The BROWN wire is your wideband output that will plug in to your old O2 sensor (remember to change settings in MS PNP to wideband O2 sensor).
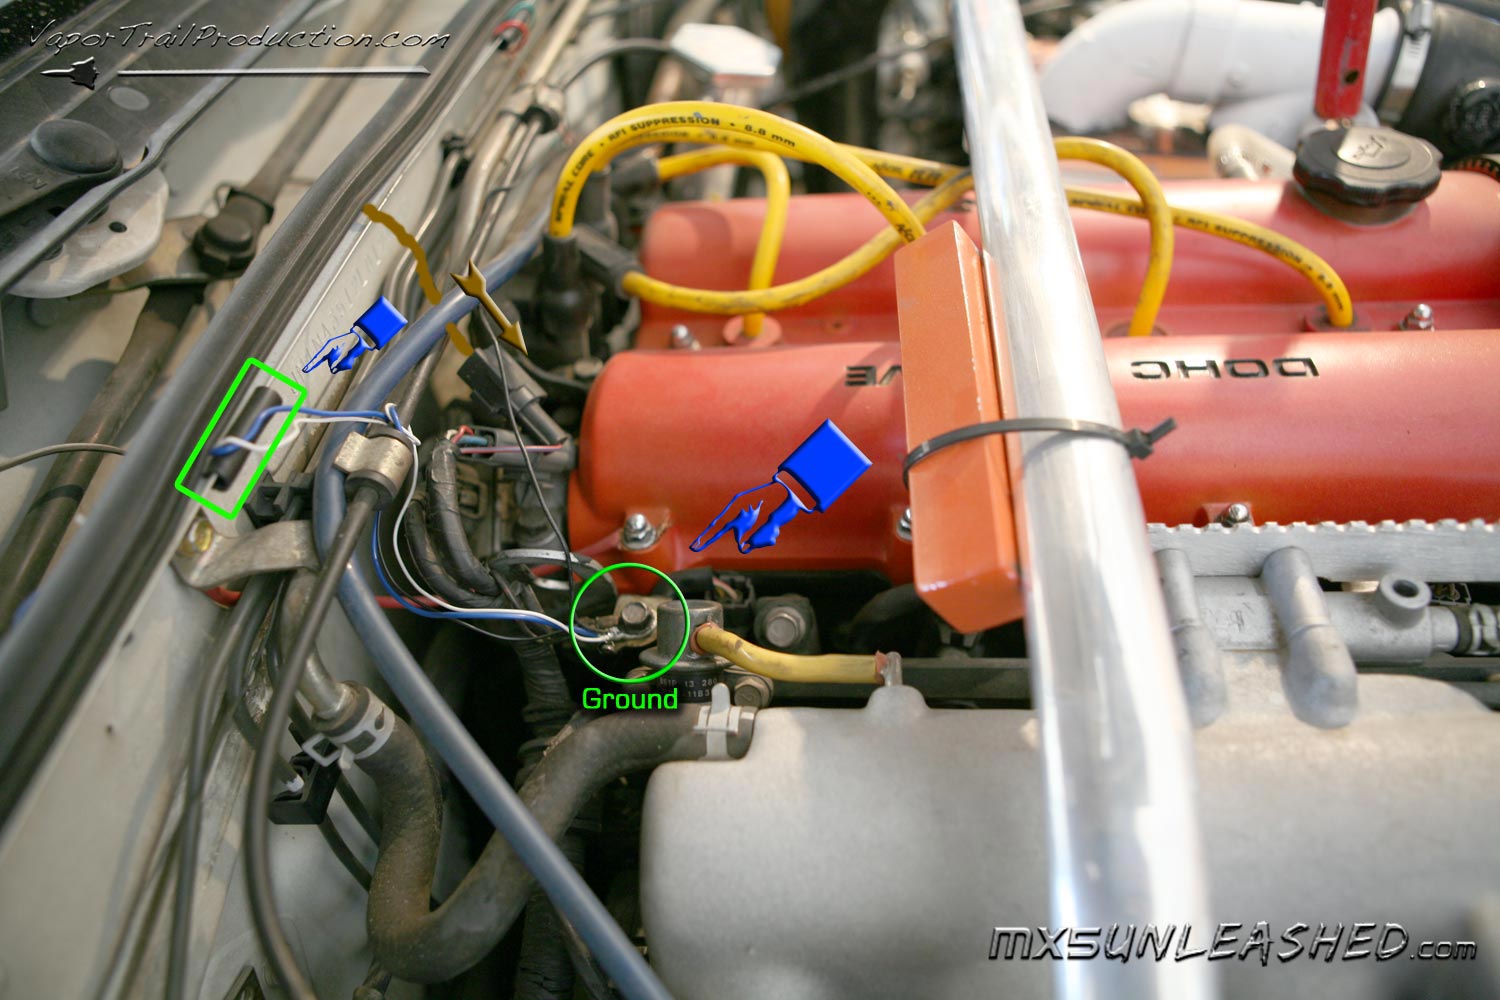
BLUE, WHITE, CALIBRATION BUTTON, and RETURN FROM AFR GAUGE (if you have one) are to be grounded. The Ground is very important and all the wires should be grounded at the same place to prevent static noise. I used ECU's ground for everything.
Also all the wires that cross the firewall have a little shield so they don't rub through.
Click the images to enlarge
The BLACK wire goes to the calibration button and LED which you will use to do free air calibrations and such. I hooked it up right over the AC vent. The button is upside down to prevent water getting in and so it is not pressed by the hood, when closed.
Click the images to enlarge
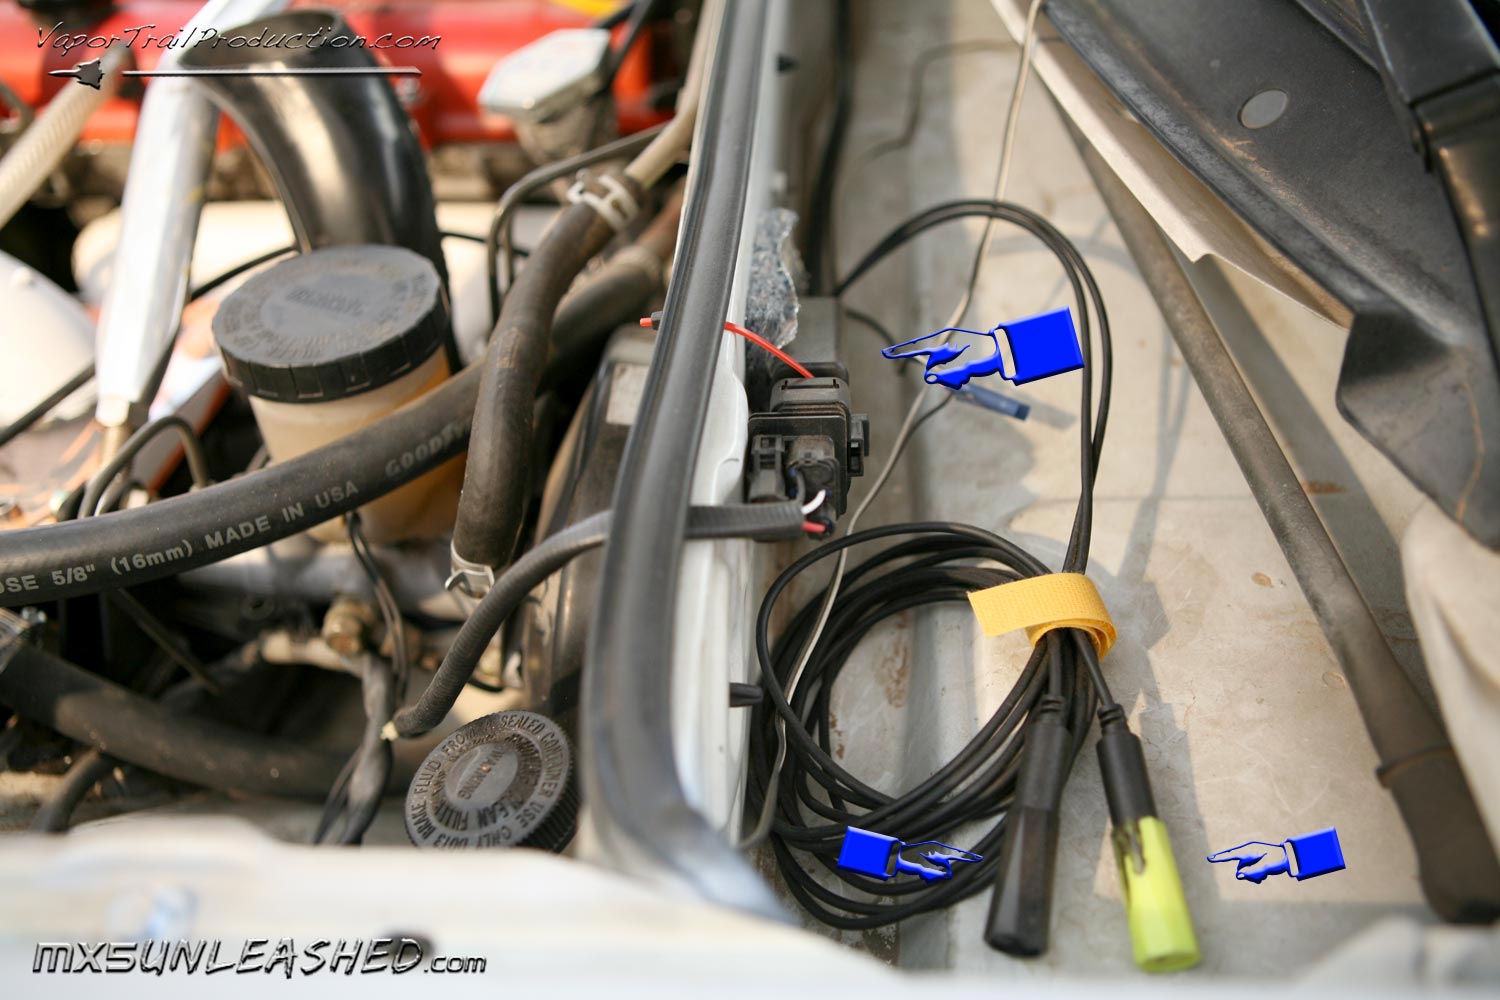
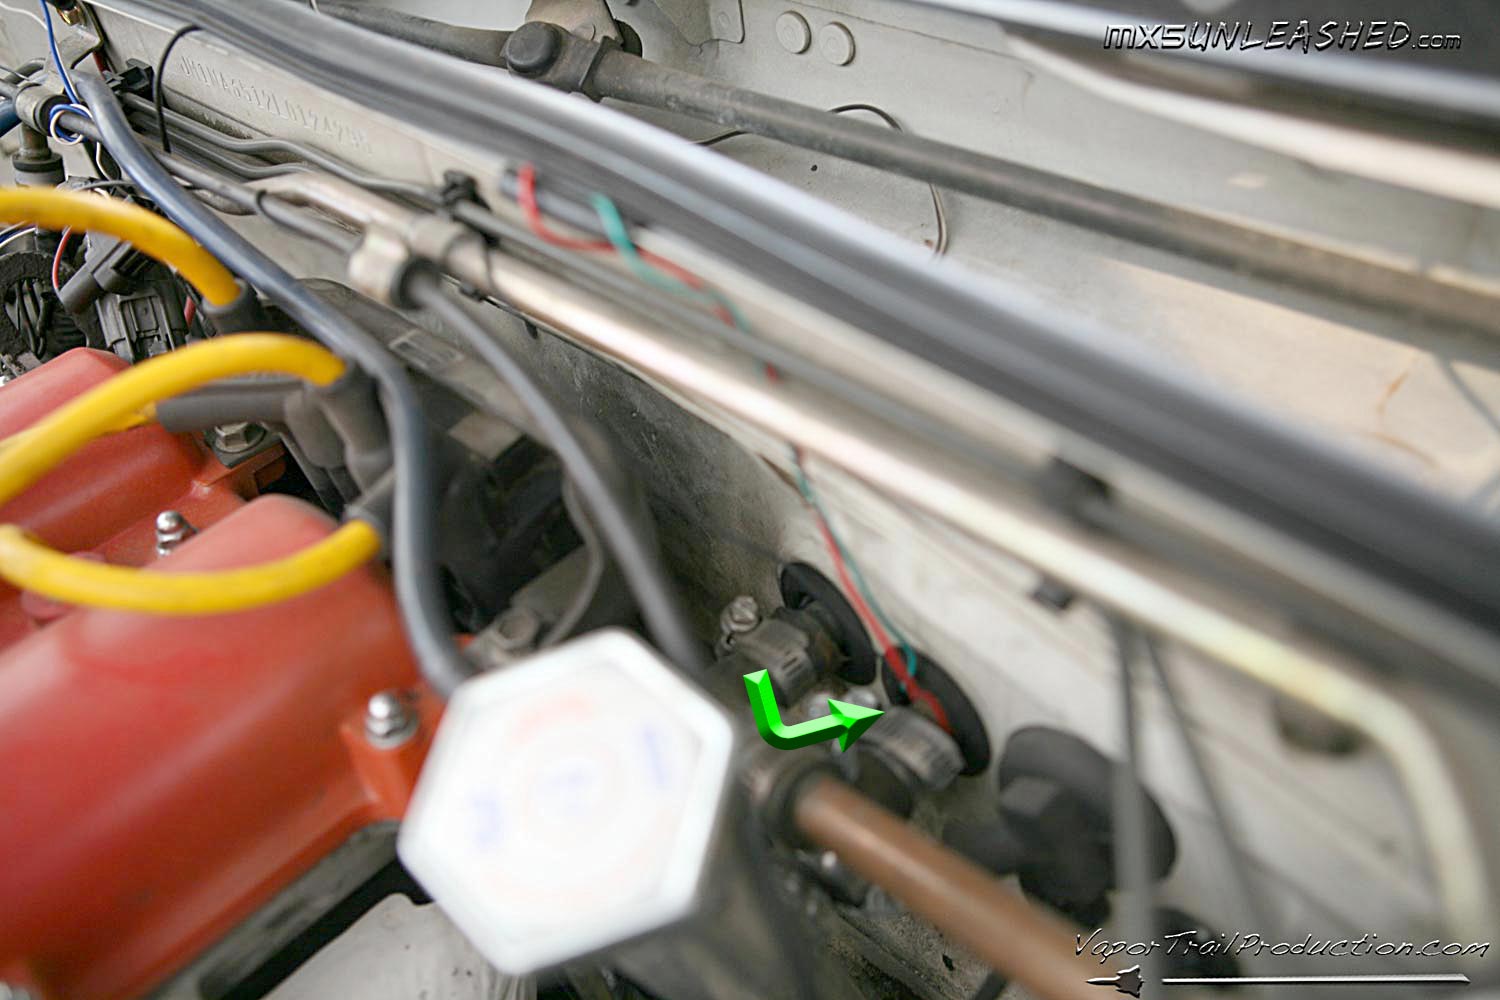
The RED and YELLOW wires. In my car I pulled them through the heater hose firewall hole.
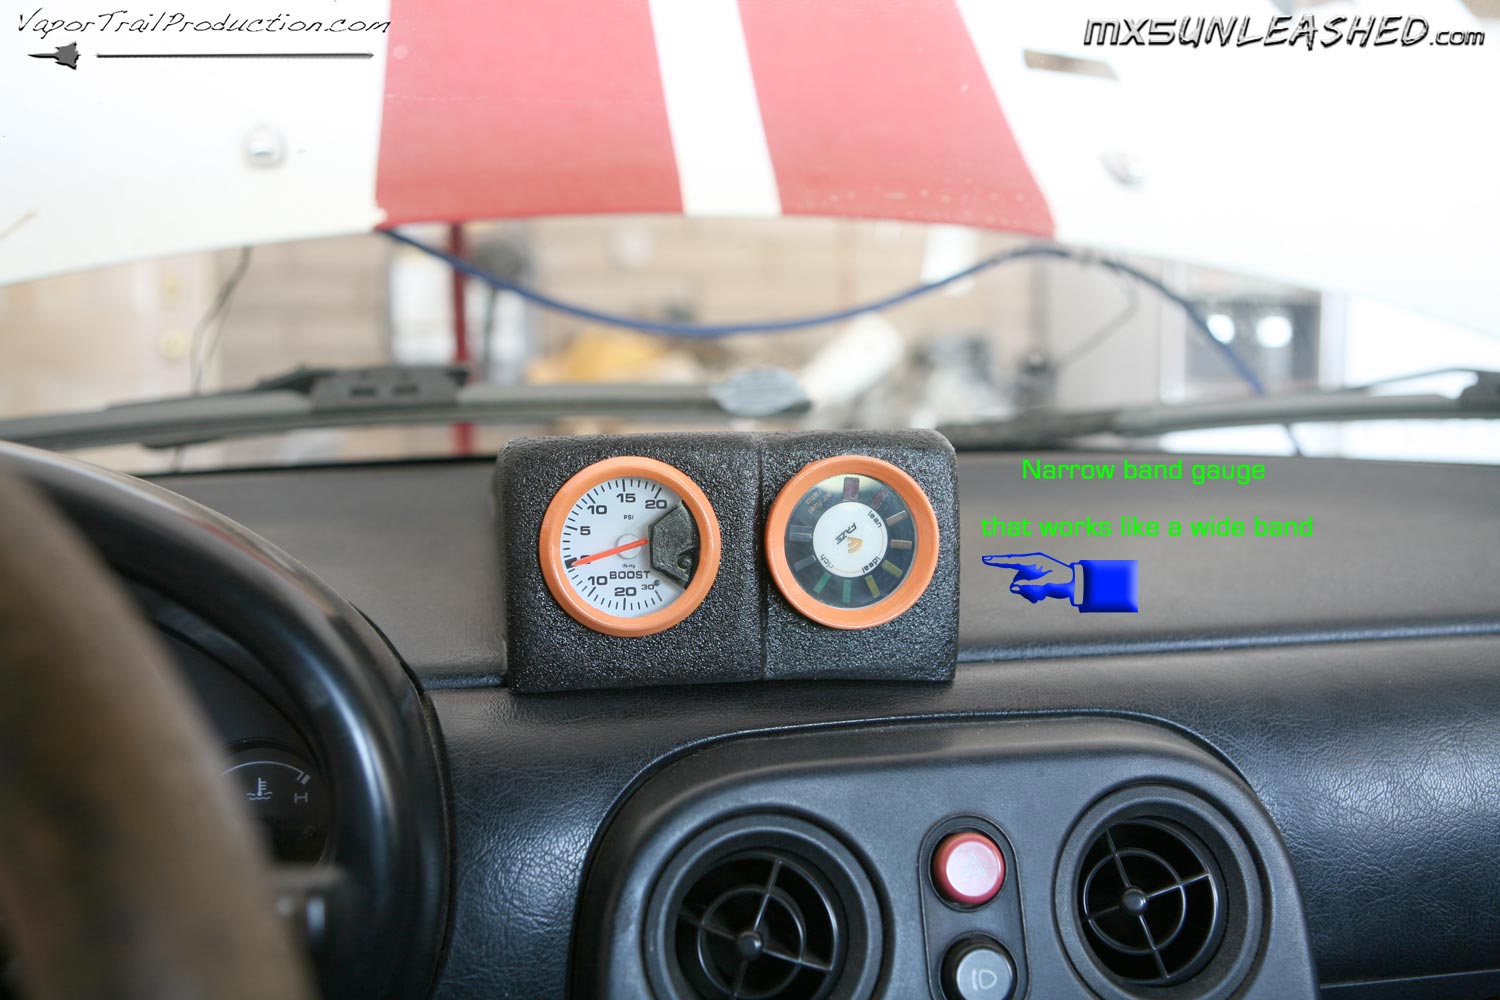
YELLOW wires goes to the Air Fuel Ratio (AFR) gauge. It's a 0V-1V style signal but you can set it up to display LIKE wideband, So if you have narrow band gauge which is much cheaper then wideband you can set it up to act like wideband. (awesome software)
RED wire is your power. I used a splitter for the fuse box to supply the power (5A fuse)
Click the images to enlarge
Now you are ready to do the Free Air Calibration (sensor outside of exhaust pipe) Watch out it will get SUPER HOT!
1. Do not connect the sensor yet.
2. Switch 12V supply to the LC-1 on and wait for 10 seconds.
3. Switch the 12V supply off after 10 seconds.
4. Connect the sensor to the sensor interface connector. The sensor must be exposed to air
for the first time calibration.
5. Switch the LC-1 on and wait for 2 minutes.
Slow and steady blinking indicates that the sensor is warming up to operating
temperature. (around 30 seconds for cold sensor)
After the sensor is warmed up, the meter automatically calibrates the sensor heater controller. During the heater calibration
the optional LED will blink fast and steady. (around 20s)
After the heater calibration is finished you should perform a free air calibration. The free air
calibration is accomplished by either pressing the push-button or connecting the black wire to
ground for three seconds and then releasing. During this procedure a connected LED will go off.
The LC-1 will now calibrate itself by using air as a reference gas with known oxygen content.
After the free air calibration is finished the LED should light up steady and continuously,
indicating correct operation of the LC-1. If it does not, refer to manual for troubleshooting.
For Calibration schedule consult your manual.
And now wait till O2 sensor cools itself down, and screw it in.
Click the images to enlarge
Tuning the O2 sensor
First, hook up your laptop to the O2 computer. Connect Terminator plug (that's the one that looks like it's just a plug with no wires) to the IN plug. Then, hook up the laptop to the OUT and turn on the LM Programmer.
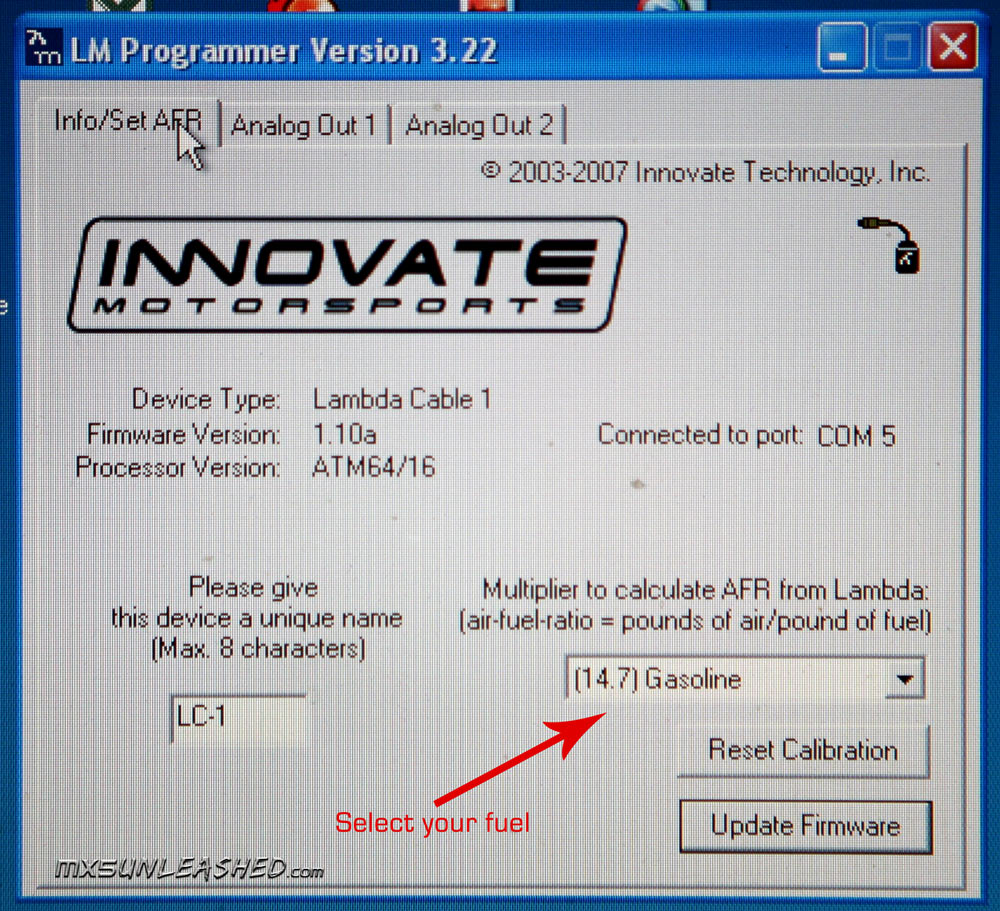
In the programmer there are 3 windows.
• 1st Info/Set AFR - here you set your fuel if you're using gasoline its 14.7.
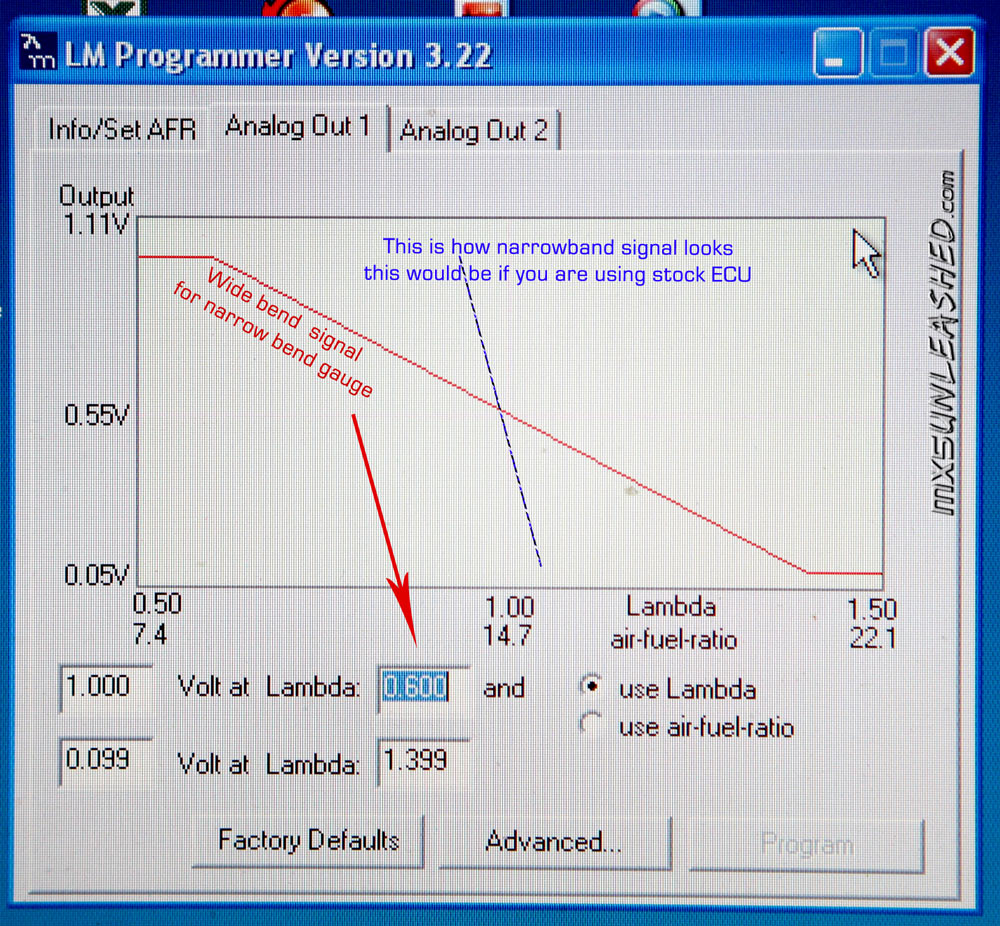
• 2nd Analog Out1 this sends narrow-band signal but if you're using narrow-band gauge, you can reprogram it to display the mixture as wide-band if you change to those settings, as on second picture.
• 3rd Its the wide-band signal. Don't put the marks all the way to the borders, you will get a lot of electronic noise. Then write down the number that's on the left in the middle. You will need it for Megasquirt update.
To make MegaTune display the output correctly, select Configurator from the MegaTune Programs File menu, or from the MegaTune group in your Start Menu. This will open up the configuration program. You will see a list in the left hand column of the Configurator that starts with MegaTune2.25 and then includes a list of project cars. The project you will use is either MSPNP MM9495 with MAF or MSPNP MM9495 without MAF, depending on whether you have kept the factory MAF or removed it and used a GM style IAT sensor. Click the plus sign in a box next to the project to expand the options under this one, then expand settings.ini, and then expand Settings.
Then select LAMBDA_SENSOR. You will see a menu of aftermarket wideband controllers at the right. Select the one that corresponds to the controller you will use. The LM-1 default will use the INNOVATE_1_2_LINEAR if you are using its default volt meter settings, while the LC-1 will use the INNOVATE_LC1_DEFAULT settings if you have not changed its outputs. Note that the DIYAutoTune.com products and many others have programmable outputs, and these options are simply for the default configuration. Adjusting the LM1 to use a wider range of output voltages, such as setting it to give 0 volts at 10:1 AFR and 5 volts at 20:1 AFR, will reduce the effects of noise in the input. This is recommended for best performance though you will need to program your LC-1 or LM-1 outputs to match, thats easy though. Once you have specified the wideband settings, go to the File menu and select Save. Then you can run MegaTune and have it display the correct air-fuel ratio.
Once you have set the Configurator for the sensor, you will need to change a few settings in the MegaSquirts memory using MegaTune. You will find most of these in the Exhaust Gas Settings option under the Basic Settings menu. You will need to set the EGO Sensor Type to Wide Band, and change the EGO Switch Point to the voltage that your controller sends for a 14.7:1 air fuel ratio. That was the number in the green oval that you wrote down while editing wideband settings on LM programer.The MegaSquirt will try to maintain this air-fuel ratio when running in closed loop mode. The Controller Authority setting limits how much it can change the amount of fuel delivered, so that a faulty sensor can only cause the engine to be off by a small amount.
The Open Loop Mode settings under the More Settings menu regulate when the MegaSquirt will start ignoring the oxygen sensor input. Unless you have modified the MSPNP to use a potentiometer TPS, you will need to set this to KPa. This lets you turn off the oxygen sensor correction above a given manifold pressure.
However, if you have a wideband oxygen sensor, you do not need to turn off this correction at full throttle like a factory ECU. Instead, you can make MegaSquirt target a lean air-fuel ratio while cruising, and go to a rich air-fuel ratio under boost and have the oxygen sensor help you target both. To enable this, select Lambda AFR Settings from the More Settings menu, and turn on the 8 x 8 AFR target table for VE Table 1. Once this is on, you can go to the AFR target table and set your targets as a function of manifold pressure or boost and RPM. The values in this target table will be the raw voltage output from the oxygen sensor controller, not actual air-fuel ratios.
MegaTune is also able to tune the VE tables on its own, based on inputs from a wideband sensor. This feature is called AutoTune. The software will adjust the VE tables in a limited range to make the air-fuel ratio match your target settings. Use this feature with caution and make sure your targets and sensor readings are correct before you enable it. You will usually still need to do fine tuning by hand. You should not rely entirely on AutoTune mode to get your car in tune.
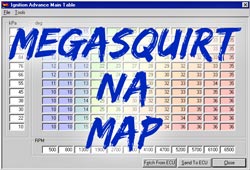
My Maps
Causion
These Maps were tested and run only in my car!
Your car may be slightly different and have different specks
! USE IT WITH CAUSION !
NATURALY ASSPIRATED (NA) READ THIS FIRST
Here is my best map for 1.6L NA car
This map is for daily drive, it is split at about 4K RPM's
any thing below is for good gas mileage, everything above is for power.
This map was done on my car which has: Ram-air, NO flap door air flow sensor,
improved ignition, improved exhaust, and MOST IMPORTANT 300cc INJECTORS
ANDWIDE BAND OXYGEN SENSOR.
So check all the tables and options make sure it matches you car.
Or just use my tables for reference.
With that in mind be causes to implement this map.
If you don't run 300cc injectors you can probably still use the VE table
VE TABLE HAS A BOOST SECTION THAT HAVE NOT BEEN TESTED YET!!!
Finally, I take no responsibilities for what will happen to you car if you run this map.